
I've tried few Illustrator tutorials on the web related to how create a disco ball, but i've never really liked the final image, so I've tried to find the right way for drawing a more realistic disco ball...
Step 1
Create a New Document.
Create a rectangular shape (I choosed ~ 175*175px). Fill it with bright radial gradient. Rasterize the shape (Top menu - Object - Rasterize and just click “ok” not changing any settings there). Then enlarge your square a bit (~150%)

Step 2
Now go to the Top Menu - Filter - Create - Object Mosaic and play with numbers there.
I choosed: Tile spacing = 1px for both width and height Number of Tiles =30 (again for both) Check 'Delete Raster' box. Now we’ve got a nice mosaic. Reduce the size of the image back to the 175*175px.

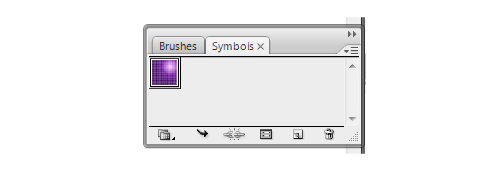
Select the rectangular and drag and drop it into the Symbols panel.
Step 3
Now create a circle (mine is ~175*175px), make a copy of it and put aside (we will need it later). Now go back to the original circle and delete its left anchor point with Direct Selection Tool (white arrow in the Tools menu).

Step 4
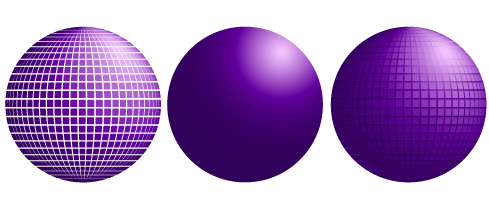
Go to Top Menu - Effect - 3D - Revolve. Change settings there following the picture below, change Surface to “No Shading” and click the Map Art button.

On the Map Art panel in the drop down menu choose the mosaic symbol we've created. Increase or decrease its size if necessary to fill half of the grey rectangle.

Go to the Top Menu - Object - Expand Appearance. Now we have to delete all the rubbish that is left on the art board. Select the sphere and press Ctrl-Shift-G three times (ungroup everything). Then click on the sphere again and move it. Select all the rubbish (shapes you won't need) and delete it.

Step 5
Select a circle we've made in the begining (the one we left aside before creating the 3d effect), fill it with the same purple radial gradient, put it underneath the mosaic (Ctrl+shift+[ ) and align them both horizontally and vertically using the align panel (Shift+F7).
Release Cliping Mask and Ungroup tiles (Ctrl+Shift+G).
Step 6
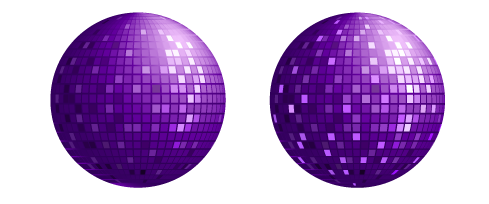
Now it’s time to use your imagination (or photo of a real disco ball) to make our disco ball looks more shiny and real. At first, lets highlight some tiles: randomly select some tiles in the "lightest area" of the ball; go to Live Color (Top Menu - Edit - Edit Colors -Recolor Artwork). Click on Edit (1), then Link Harmony Colors (2), then increase Brightness to maximum (100%) and decrease Saturation to about 30-40% (depending on the colors you're using).

Step 7
Now select some other tiles, go to Edit Colors again and play with the colors there (make them darker or lighter). It's better to change Brightness and Saturation only. Unless you want your disco ball looks more colorfull). Repeat “Select-Edit Colors” until you are satisfied with the result.
Step 8
Now lets add some sparkles to the highlighted areas. Draw a 4 points star with the Star Tool (see numbers to use below). Scale it down to ~50%, copy and paste in front (Ctrl+F), rotate 90’ and scale to 70-50%. Now we have a nice sparkle. Place sparkles to the highlighted areas of your disco ball.

Add a holder (just a simple rectangle with a gradient fill). That's it - we've got a disco ball! :)
