
In this tutorial I will show you how to create a nice glossy dice icon.
Step 1
Let's start with creating a new 68*68px square. We will use it for the dice's "base". (You'll understand later why i've chose blue color for it). Copy it, reduce the size to 64*64px, go to Filter-Stylize-Round Corners and choose 10px for the corners radius. Change the color of the square to red.
Then create a small circle (mine is 10*10px), fill it with white color and create the sides for your dice. Actually we will need only three sides so if you are lazy just create "6th","4th" and "5th" sides.

Select each "side" of the future dice and drag-and-drop them to the Symbol panel. You will have 6 (or only 3 if you are being lazy) symbols there.
Step 2. Select the blue "base" square and go to Effects-3d-Extrude & Bevel. Change Extrude Bevel to 68px (if you use the same square size as I do), the Surface to "No shading" (at the bottom of the window) and click on the "Map Art..." button on the right top of the 3d effect window.

Now, one by one we will add "numbers" to the square sides.
In the Symbol drop-down menu select "4th" symbol and select "1 of 6" for the Surface .

Do not press "Ok" yet. Keep doing the same thing for all visible sides of the dice. Select "6" symbol and "6 of 6" Surface.

tutorial_41
And "5" symbol for "5 of 6" Surface. As soon as we do not have empty sides we can press OK button and have a cup of tea/coffee.

tutorial_51
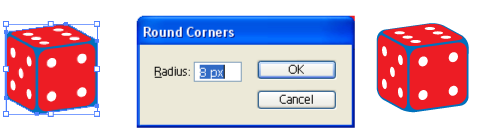
Step 3. Expand (Object-Expand Apperiance) and Ungroup everything. Select all blue objects, go to Pathfinder panel and click on "Add to shape area". Expand. Select the blue"base" and go to Filters-Stylize-Round Corners. Select 8px for the Radius and press OK. Easy, isn't it?
tutorial_61
Select the base again and fill it with a radial gradient (i choosed R:255 G:181 B:194 (for the center of the gradient); R: 255 G:0 B:0 (for the medium point); R:189 G:0 B:0 )(fig.1)
Select the sides of the dice and fill them with a linear gradient (mine is: R: 255 G:0 B:0 to R:173 G:0 B:0) (fig.2) Now it is better to close open path either using Ctrl+J command or using this script.
Draw two arcs using an Arc Tool (hold "Shift" while drawing) (fig.3, 4).

tutorial_7a1
Select squares on the 4th and 5th sides. Ctrl+C Ctrl+F (paste in front) them. Then select the first arc and the square underneath (fig.5). Go to Pathfinder panel (Shift+Ctrl+F9) and click on Divide icon . Do the same with the second arc and the square underneath. (fig.6)
Select the top segments and slightly change their color. Select the lower segments and delete them.

tutorial_91
Step 4. Now select the entire squares and Ctrl+C Ctrl+F them again. Then move them to the right (or to the left, if you'd like to) but use Shift+arrow for that because we will need to move them back later exactly in the same place. With all three squares selected go to Object-Path-Offset Path and enter 1px in the Offset field.

tutorial_101
Following the picture below move the marked anchor points a bit. To get an idea why we are doing it, scroll this tutorial a down and everything will become more clear then.

tutorial_111
tutorial_12a
Now for each pair of the squares do next: select them and click on the Minus Front Icon in the Pathfinder panel. Delete all unnecessary shapes.

tutorial_131
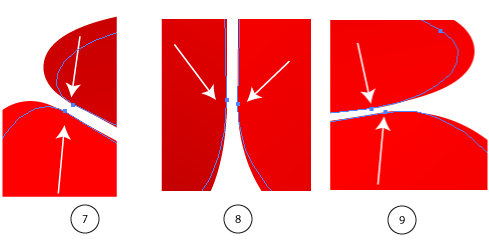
Step 5. Select the anchor points (I marked them with arrows) with the Direct Selection Tool (A) and delete them (fig. 10). Do the same for each of the three shapes.

tutorial_13a1
Now you should have something similar to fig.11 in front of you. Following the picture below select two of the ouside points and press Alt+Ctrl+J to average them (Axis: Both). And then Ctrl+J to Join them (Points: Corner). Do the same for three pairs of the outside points (marked with arrows).

tutorial_14a
Now move the "triangle" in the place shown below (if you moved it using Shift+arrow you are able to move it to the same place using this short cut again) and fill it with white.

tutorial_15
Step 6. Now it's time either to have another cup of tea or create a star to highlight a corner of the dice. Create a star shape with the Star Shape Tool following the numbers on the picture below. After that reduce the size of the star, copy it and reduce the size again. Then align two stars together, fill them with white and put on the corner.

tutorial_16
Step 7. Lets make our white "dots" look more realistic. Fill them with grey-white linear gradiend using the angles from the picture below. After that select all dots, go to Object-Path-Offset Path and enter 1 px in the Offset field. Select the outer "dots" and fill them with "dark red-red" gradient. On the top side of the dice move the red dots a bit (East-North direction) to show some perspective...

tutorial_17

glossy_dice_tutorial_final
Here it is.